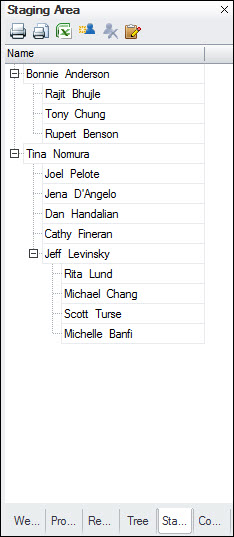
To access the Staging Area panel:
· Click the View tab and select Staging Area from the Panels section to display the Staging Area panel.
The Staging Area panel is a useful place to hold records until you find the right place for them in your chart. In addition, the Staging Area contains orphan boxes (unassigned records) from the import process and holds them until you find the right chart location for them.
You can drag boxes from the chart or Tree panel to the Staging Area panel and vice versa. You can add, delete, drag, and drop records within the Staging Area. Edit a record in the Staging Area panel by double-clicking it.
A box in the Staging Area panel is not part of the chart until you drag it from the Staging Area panel to the chart.
The Staging Area panel has the following elements:
Element |
Name |
Description |
|
Print the Staging Area panel contents. |
|
|
Print Preview |
Preview how the Staging Area panel contents will look when printed. |
|
Send to Excel |
Export the Staging Area panel contents to an Excel spreadsheet. |
|
Insert New Person |
Add a person to the Staging Area panel following the selected person. |
|
Delete Person |
Delete the currently selected person from the Staging Area panel. |
|
Modify Staging Area Settings |
Modify the fields displayed in the Staging Area panel. |
In the default setting, the Staging Area panel displays the name of each member being held in the panel.
To modify Staging Area panel settings:
1 Click
the ![]() button
to display the Staging Area
Settings dialog box.
button
to display the Staging Area
Settings dialog box.
2 Add fields to the Staging Area panel display by selecting them in Available Fields and clicking the Add button.
3 Remove fields from the Staging Area panel display by selecting them in the Selected Fields and clicking the Remove button.
4 Use the Move Up and Move Down buttons to adjust the positions of the Selected Fields.
5 Use the Format button to change the formatting of a Label or Field.
6 Click OK when finished.
Note: To change a label name, click the label (Name, Title, and so on) and update the name as necessary. You can reset the label to the original text by right-clicking a label and selecting the Use Original Label menu item.