The publishing process for OrgPlus is identical regardless of the final format. There are different options and specific features available for some formats. This topic describes the process as a whole, and discusses the specific features available for each format.
See also:
OrgPlus Plug-in Security Options
To publish your chart:
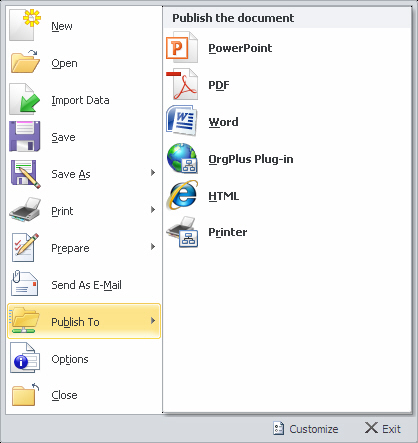
1 With your chart open, click the File tab, then click Publish To.
2 Choose a publishing option.
The Publishing Wizard dialog box opens.
3 Select the appropriate publishing options, which vary based on the publishing target you select. Click the links below for information on your selected publishing target.
The following options are available for all publishing formats:
· Expand Collapsed Branches: Before publishing the chart, expand all collapsed chart branches.
Page Layout Options (Word, PowerPoint, PDF, and Printer):
4 Click Next to specify the publish output settings.
Notes: Selecting the Wall mode outputs only the chart. The Publish Options Page is skipped. Clicking Next with Enable Security (OrgPlus Plug-in) selected displays the Specify Security Options page. See OrgPlus Plug-in Security Options for more information.
5 If you are publishing to PowerPoint, you can select an existing PowerPoint template to be used when publishing. Select Use PowerPoint Template and then click the Browse button to select a template.

6 If you are publishing to PowerPoint, Word, PDF or Printer, make sure the Cover tab is selected. The Include Cover Page checkbox is selected by default. Enter the Cover page text and optionally use the Font button to set the format.
If you are publishing to PDF or Printer, you also have the following optional settings:
Use the text boxes at the top and bottom of the Cover page text section to enter header text (top text box) and footer text (bottom text box).
Click the Background Image button to browse to an image file to include as a background image on the cover page.
Note: You can include AutoText elements in your cover page, such as author’s name or date last revised. Click the AutoText button to display a drop down menu of AutoText entries.
7 If you are publishing to PowerPoint, Word, PDF or Printer, select the Contents tab. Select Include Contents Page to include a Table of Contents, and then Nest entries based on hierarchy to format it as a nesting table, if desired. You can optionally use the Font button to set the format.

8 Select the Chart Contents tab. A list containing all the charts and sub-charts within the current project is displayed. By default all charts and sub-charts are included. Clear any sub-charts you do not want included in the published document.

Note: If you are publishing to PowerPoint, click the Options button to display the Chart Contents Options dialog box. By default, your PowerPoint presentation will be published with links from Chart pages to the Contents page and to the Index page. You can enable or disable the links as needed.

9 If you are publishing to PowerPoint, Word, PDF or Printer, select the Index tab. Select Include Index Page to include the index page.

These are the Index formatting options.
· Select Field For Index: Select the field used to create the index.
· Sort By: Select the field by which the index is sorted. You can then select to sort in Ascending or Descending order.
· Columns: Define the number of columns per index page.
· Levels up to: Select the number of chart levels to include in the index.
· Click Font to change the format of the Index.
· Index Order: Specify which way you want the index to flow. By default, the index flows down, then over.
10 When you are finished with the Publish Settings Page, click Next to display the Publish Output Page dialog box.

11 In the Output field, enter the full path and name of the output file, or click Browse to specify the name and path using standard Windows file browser.
12 Select the following options, as appropriate:
· Launch PowerPoint/Word/Browser/PDF when the publish operation is complete.
· For PDF, OrgPlus Plug-in, and HTML, you can save to disk or upload to a server using FTP.
· Disk: Saves the output file on disk according to the path and file name entered in the Output field. You can also click Browse to use the standard Windows browser.
· FTP: Saves the output file to an FTP server according to the path and file name entered in the FTP Location field. You can also click FTP to open the Session Profile dialog box. The Session Profile dialog enables you to configure an FTP session.
· For OrgPlus Plug-in, an HTML button is shown if you selected the HTML Container option. Select the HTML to define the HTML container settings. For more information see the OrgPlus Plug-in Deployment article in the Support Center at www.orgplus.com/support/.
· When you are publishing to a printer, select Show Print Dialog to display the standard Print Options dialog box before printing the document.
· To send the published chart to one or more e-mail addresses, select the Send as E-mail checkbox. Then click the Send button to display the Send as E-mail dialog box.
Note: To use this feature you must define your e-mail field with the E-mail category. See Adding and Deleting Fields in Working with Charts: Basic Charting for more information on how to define field properties.

· E-mail Client – Select this option to use your default e-mail client.
· SMTP – Select this option to use Simple Mail Transfer Protocol. This option sends the e-mail with the SMTP settings defined in OrgPlus. See Using the Options Dialog Box for more information.
13 Click OK to complete the publishing process.
Note: Publishing (including e-mail distribution) can be automated. See Republishing in Automation for more information.