The sub-chart wizard enables you to define a set of rules that are used to break your chart into sub-charts.
To create sub-charts using the Sub-chart Wizard:
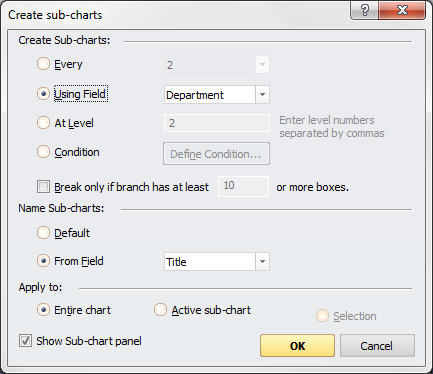
1 With the chart open, click the Insert tab and select Wizard to display the Create Sub-charts dialog box.
2 Define your sub-charting options as follows:
· Create Sub-charts: Select one of the following criteria according to which sub-chart breaks should be created.
· Every: Creates a sub-chart break at every nth level in the chart.
· Using Field: Creates a sub-chart at each occurrence of the field.
· At Level: Creates a sub-chart break at the specified levels. (Separate level numbers by comma.)
· Condition: Defines a condition based on complex criteria. The Condition dialog is displayed.
· Smart Sub-chart breaks: Specify the minimum number of boxes in a branch before a break is inserted.
· Name Sub-charts: Specify how each sub-chart page should be named. Select from:
· Default: All sub-charts are named based on the default: Sub-chart1, Sub-chart2, and so on.
· From Field: All sub-charts are based on the value of the specified field. The field value is extracted from a box when a sub-chart break is inserted.
· Apply to: Specify whether the sub-chart rules are to be applied to the Entire Chart, the Active sub-chart, or the current Selection.
3 Click OK. The chart is sub-charted according to the selected options
Note: By default, the Sub-chart panel is automatically displayed after creating sub-charts. Clear the View Sub-charts check box if you do not wish to display the Sub-chart panel.