This topic explains how to add, modify and delete profiles.
See:
This topic describes how to create new profiles based on fields defined in your chart.
To create a new profile:
1 With the Profile panel open:
Select Click here to create a Profile if no profiles have been created.
OR
Click the Manage Profiles button ![]() to display the Manage Profiles
dialog box.
to display the Manage Profiles
dialog box.
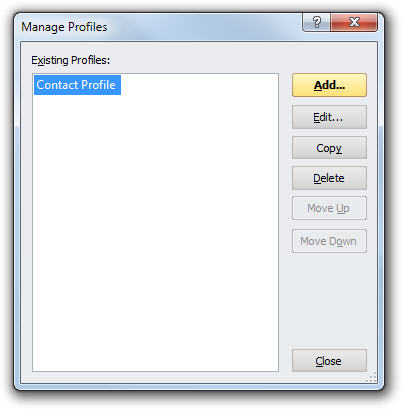
2 Click Add to display the Profile Settings dialog box.
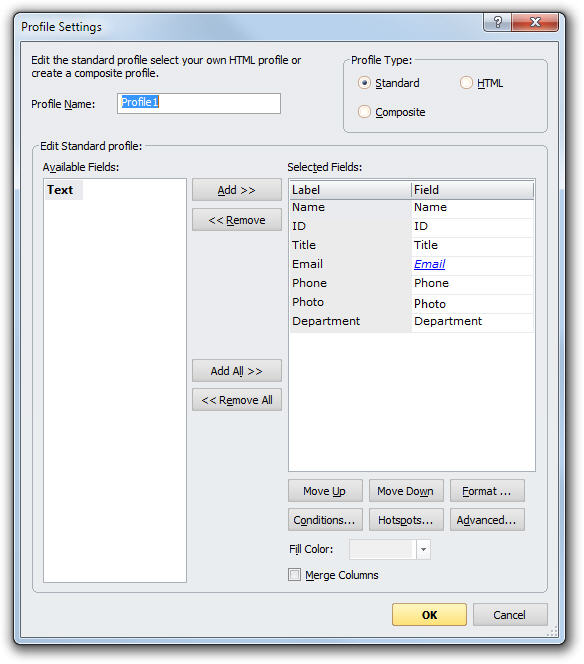
3 Use the following elements in Profile Settings dialog box to create your profile:
|
Element |
Description |
|
Profile Name |
Enter a name for the profile. |
|
Profile Type |
Select a radio button to specify the type of profile you want to create: Standard, Composite, or HTML. · For Composite profile settings, see Creating Composite Profiles. · For HTML profile settings see Creating HTML Profiles. |
|
Available Fields |
This area lists the fields available to be included in the profile. |
|
Selected Fields |
This area lists the fields selected to be included in the profile. To change a label name, click the label and change it as necessary. You can reset a label to its original text by right-clicking it and selecting Use Original Label from the context menu. |
|
Add |
Select any available field and click this button to add the field to the selected fields list. Optionally, you can add a free text field to your profile by selecting the field labeled Text. Once added, you can edit both the Label and Field values associated with the Text field. |
|
Remove |
Click any selected field and click this button to remove it from the selected fields list. |
|
Add All |
Click this button to add all available fields to the selected fields list. |
|
Remove All |
Click this button to remove all selected fields. |
|
Move Up |
To move a field up in the selected fields list, click this button. |
|
Move Down |
To move a field down in the selected fields list, click this button. |
|
Format |
Select one or more fields and click this button to set font and alignment properties. You can also add icons before or after a field value to bring attention to a field. |
|
Conditions |
To display the Conditional Formatting dialog box where you can specify conditions to control how fields are displayed in the profile. See Conditional Formats for more information. |
|
Hotspots |
Use this button to define additional properties (such as border color) if this profile is to be used as of a hotspot. |
|
Advanced |
This button displays the Advanced Profile Settings dialog box where you can select: · Show Grid to include row and column line separators. · Exclude from profile selector to exclude this profile from the profile panel. This is useful for profiles that are used as hotspots or included in composite profiles. · Display profile for top box if no selection to display the profile for the top box when no box is selected. |
|
Fill Color |
Select the background fill color for the profile from the drop-down list. You can specify different colors for odd and even rows. |
|
Merge Columns |
You can show a field value without a label by selecting the label of the field and clicking the Merge Columns checkbox. For example you can show the employee name without the label Name. |
4 Click OK.
Note: If the Manage Profiles dialog box is displayed, click Close. A blank profile is displayed in the Profile panel until you select a box in the chart.
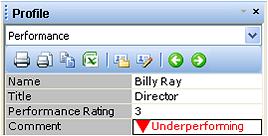
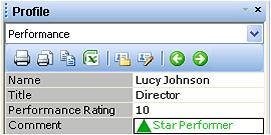
Using the Condition button you can define a set of conditions. If the defined criteria are met for a given record, fields within the profile are then reformatted in accordance with the conditional format. The example below shows how you can bring attention to high and low performers within your organization.
|
|
|
A composite profile is composed of one or more standard profiles.
To create a composite profile:
1 Select Composite in the Profile Type area of the Profile Settings dialog box to access the Edit Composite profile display.
2 Select profiles from the Available Profiles list and add to the composite profile. Profiles can either be added as Tabs or as part of the main profile. The Available Profiles list is populated from defined Standard profiles. See Creating Standard Profiles for more information on creating profiles.

3 Select the Format button to set border properties for each profile.
4 Click the Layout button to specify the layout of profiles within the composite profile.
5 Optionally, you can conditionally include any selected tab or profile based on a set of criteria. Use the Conditions button to specify the inclusion criteria for any profile.
Note: A single composite profile can be used to display different sets of information based on the selected box. For example, one set of tabs can be shown for managers and another for individual contributors.
6 Click OK when finished.
OrgPlus has the ability to render customized HTML pages inside the profile panel. These pages can access data provided in the chart to produce an interactive and visually rich profile. You can use standard HTML editing tools to create HTML profiles.
To create new HTML profiles:
1 In the Profile Type area of the Profile Settings dialog box select HTML to display the HTML version of the dialog box.
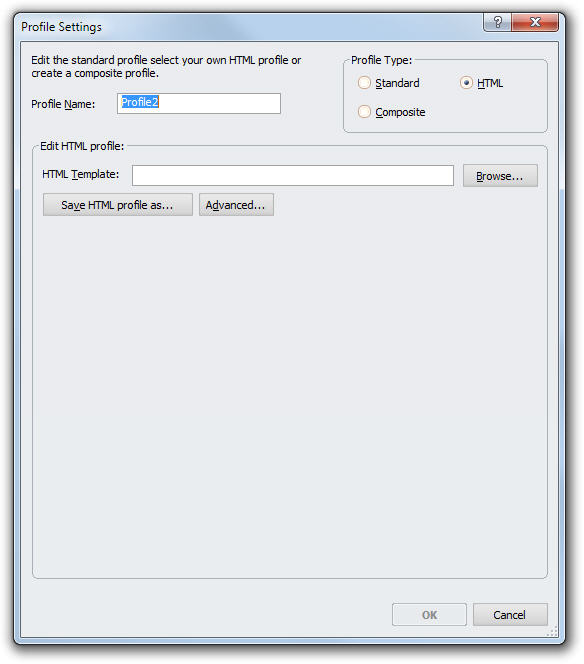
2 Enter the profile name.
3 In the HTML template text box, type the filename and location of an HTML profile.
OR
Click Browse to locate an HTML template.
OR
Click Create Default HTML profile to define where the default template is saved.
Note: It is preferable that this HTML file is online so that when you distribute your OrgPlus file, your recipients will be able to view the profile as well.
4 Click OK to create the profile.
OrgPlus can dynamically replace fields in your HTML profile. Use the following syntax to include OrgPlus field data in your HTML profiles:
· [@FIELDNAME@], where FIELDNAME is the name of any field defined in define fields. For example, [@Name@] displays the value of the Name field, for the selected box.
The following is a basic HTML profile that displays the selected user’s name and title:
<HTML>
<BODY>
Name:[@Name@]<BR>
Title:[@Title@]
</BODY>
</HTML>
You can modify profile settings by clicking the Edit… button in the Manage Profiles dialog box. OrgPlus displays the Profile Settings dialog box. See Working with Profiles for detailed information.
You can copy a profile. Copying a profile, then editing the copy is an easy way to create a new profile. Use the Copy button in the Manage Profiles dialog box to duplicate profiles.
You can delete a profile that is no longer required.
To delete profiles:
1
With the Profile panel open, click the Manage Profiles
button ![]() to display the Manage Profiles
dialog box.
to display the Manage Profiles
dialog box.
2 Select the required profile and click Delete.
3 Click Close to close the dialog box.