Adding and Deleting Fields
A box can contain any number of fields. A field represents information, such as name title, phone number, and so on.
See:
Adding Fields
To add fields:
1 Click the Home tab and select Define Fields from the Fields and Formulas section. OrgPlus displays the Define Fields dialog box.
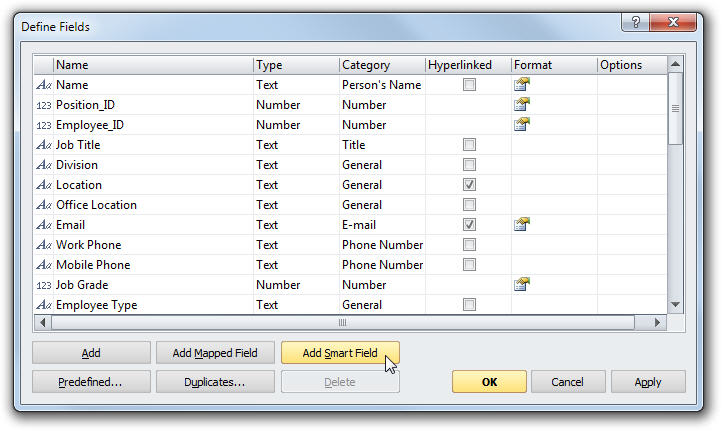
2 Click Add to add a field.
3 Enter a name in the new empty field in the Name column.
4 Click the Type column to display and choose from a drop-down list of field types:
· Text
· Date
· Picture
· Number
· Formula
5 If the field type is Text, Number, or Formula, you can also specify a Category. Click the Category column to display and choose from a drop-down list of categories.
· For fields of type Text, select the applicable category, such as Title, Person’s Name, Zip Code, and so on.
· For fields of type Number or Formula, select the applicable category, such as Number, Money, or Percentage.
6 Select Hyperlinked if you want the field to be a hyperlink. For example, an e-mail address or web page.
7
Click the Format button ![]() to specify how a field is displayed.
Not all field types have formatting options.
to specify how a field is displayed.
Not all field types have formatting options.
8
Click the Formula button ![]() to define a formula for a field.
to define a formula for a field.
9 Click OK. OrgPlus asks if you want to apply the newly created field(s) to all chart boxes. Click Yes to add. If you click No you can then selectively add fields later.
Defining Field Properties
OrgPlus offers a number of options for formatting fields.
To format Name fields:
1 Click the Home tab and select Define Fields from the Fields and Formulas section. OrgPlus displays the Define Fields dialog box.
2
Select the name field that you want to format and then click
the Format button ![]() .
.
OrgPlus displays the Name Formats dialog box.
3 Choose a format and click OK.
To format Number fields:
1 Click the Home tab and select Define Fields from the Fields and Formulas section. OrgPlus displays the Define Fields dialog box.
2
Select the number field that you want to format and click the
Format button ![]() . OrgPlus displays a dialog box based
on the Category of the field (Number, Percentage, or Money).
. OrgPlus displays a dialog box based
on the Category of the field (Number, Percentage, or Money).
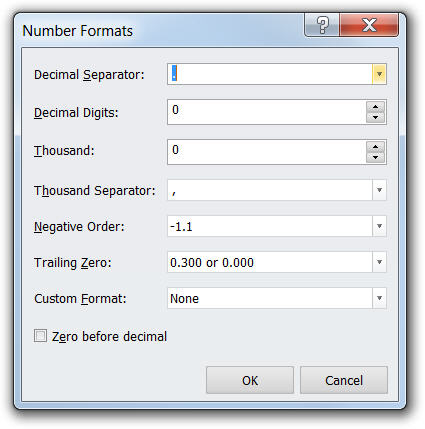
3 Define the format from the following options:
· Decimal Separator: Select the character to be used to represent the decimal point.
· Decimal Digits: Specify the number of digits to be shown to the right of the decimal point.
· Thousand: Specify the number of digits that are delimited between each thousands separator.
· Thousand Separator: Specify the character to be used as a thousand’s separator.
· Negative Order: Specify the format of negative numbers.
· Trailing Zero: Specify the number of zeros to the right of the decimal point.
· Custom Format: Select a number of leading zeros from the drop-down list.
· Zero before decimal: Place a zero before a fractional amount (0.01 vs. .01).
· Positive Order: Select how to format currency amounts ($1.1 or $1,1 or 1.1 $ or 1.1$). (This option is available only when the Money category is selected.)
· Money Symbol: Select a currency symbol (for example, "$"). (This option is available only when the Money category is selected.)
4 Click OK to save your settings.
To format Date fields:
1 Click the Home tab and select the Define Fields from the Fields and Formulas section. OrgPlus displays the Define Fields dialog box.
2
Select the field that you want to format and click the Format
button ![]() to display the Date
Format dialog box.
to display the Date
Format dialog box.
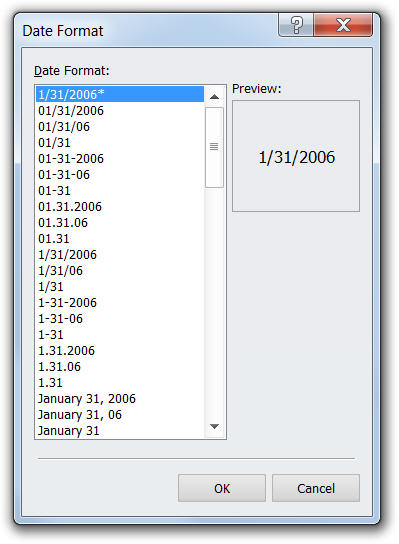
3 Choose a format and click OK.
To format E-mail fields:
1 Click the Home tab and select Define Fields from the Fields and Formulas section. OrgPlus displays the Define Fields dialog box.
2
Select an E-mail field and click the Format button
![]() to display the E-mail Format
dialog box.
to display the E-mail Format
dialog box.
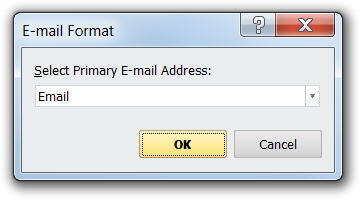
3 Select from the drop-down list to specify the primary e-mail address.
4 Click OK.
Note: You must apply the E-mail category to the e-mail field to use the E-mail Group feature. See Using Groups for E-mail Distribution. You can define more than one e-mail field, and designate a specific e-mail field as the primary one used for E-mail Distribution, E-mail Group, etc.
Adding Predefined Fields
Predefined fields make adding new fields to your chart a one step process. When you add a predefined field, all parameters (Type, Format, Category, and so on) are automatically configured.
To add Predefined fields:
1 Click the Home tab and select Define Fields from the Fields and Formulas section. OrgPlus displays the Define Fields dialog box.
2 Click Predefined to display the Select Fields dialog box.
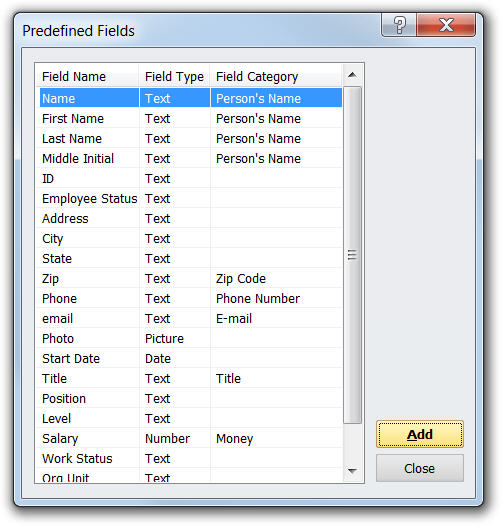
3 Choose a field and click Add. Repeat this step to add additional fields.
4 Click Close.
5 Click OK. OrgPlus asks if you want to add the new field(s) to all chart boxes.
6 Click Yes to add, or click No if you want to selectively add fields later.
Deleting Fields
You can delete any field. Deleting a field removes the field from any boxes in which it is displayed.
To delete fields:
1 Click the Home tab and select Define Fields from the Fields and Formulas section. OrgPlus displays the Define Fields dialog box.
2 Select the field that you want to delete.
3 Click Delete. A warning message asks you to confirm that you want to permanently delete the field. Click Yes to delete or No to cancel the action.
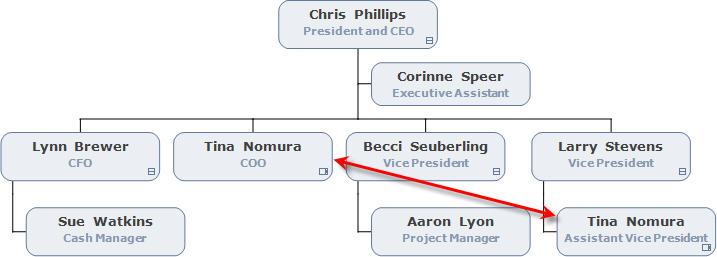
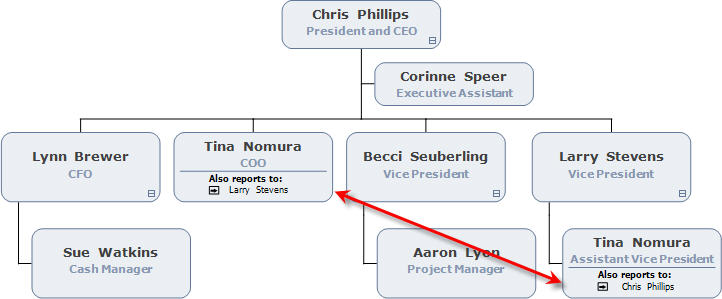
Handling Duplicate Records
Your organizational charts may contain people who report to more than one manager. An employee reporting to more than one manager typically has a dotted line reporting relationship to the secondary manager. The chart below contains an employee who appears in more than one box in an organizational chart:
Note:
Any person who appears more than once in your organizational chart has
an ![]() icon in lower right corner of
their box. Click this icon to navigate to the next occurrence of that
person.
icon in lower right corner of
their box. Click this icon to navigate to the next occurrence of that
person.
To identify dotted line reports in your chart
1 Click the Duplicates button in the Define Fields dialog box to display the Identify Duplicates dialog box.
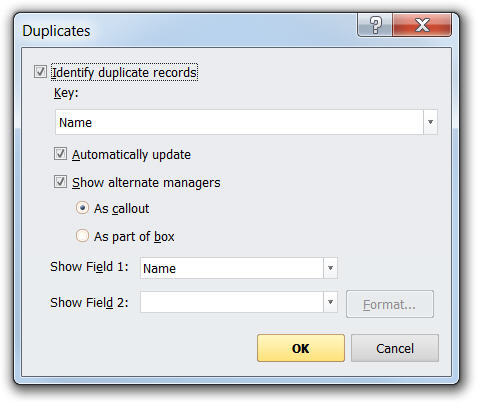
2 Click the Identify duplicate records checkbox.
3 Use the Key drop-down menu to select the key field for identifying your duplicate records.
4
Select the Automatically Update checkbox if you want
the ![]() icon in chart boxes when manual edits
are made to a chart.
icon in chart boxes when manual edits
are made to a chart.
5 Select the Show Alternate Managers checkbox to show information about alternate managers. Alternate manager information can be shown using one of two methods.
·
As Callout – Displays the duplicates icon ![]() in charts. When you click
the icon, a callout displays the alternate managers to whom the employee
reports.
in charts. When you click
the icon, a callout displays the alternate managers to whom the employee
reports.
· As part of box – Displays the alternate manager information inside the box.
6 If alternate manager information is shown, you can specify which fields are displayed using the Field 1 and Field 2 drop-down lists.
7 If you are displaying alternate manager information inside the box, use the Format button to specify the formatting of in-box text.
8 Click OK.